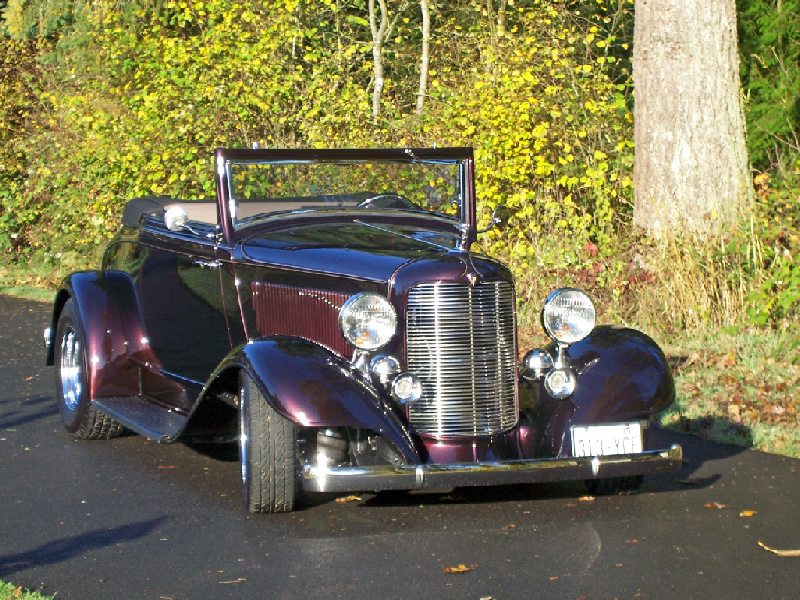
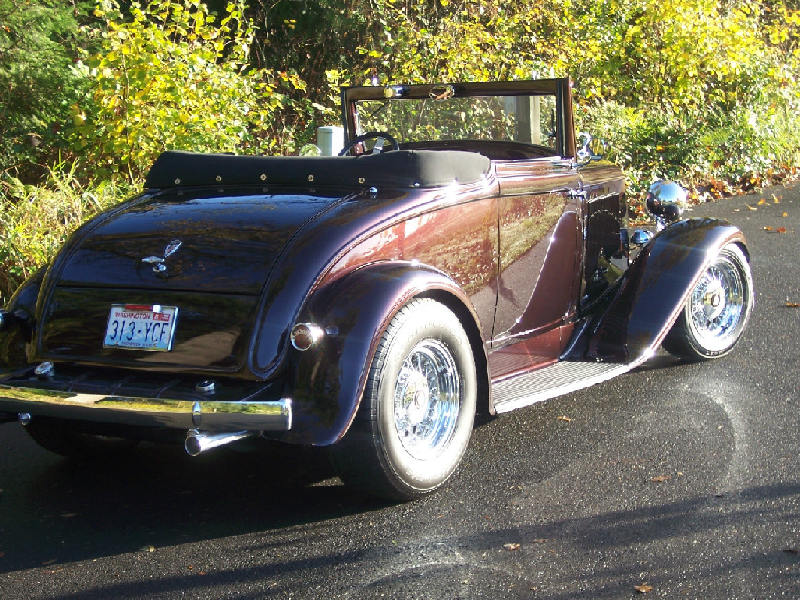
1932 Desoto Custom SC Convertible Coupe
The Desoto showed up on eBay in January, 2006. It was a rust-covered roller that
sported well over a dozen bullet holes. The skin of the rumble seat (which later
became a trunk) was rusted beyond repair. The rear fenders, gas tank cover, running
boards, door window frames, floor, grille insert and lower grille shell apron were
also rusty trash and, as it turned out, the only salvageable part of each door was
the upper beltline molding. Further, the front fenders had spare tire wells that
I didn’t want and the car was missing most of its rare trim parts. Adding to the
negatives was the location of the car in Alberta, Canada, nearly a thousand miles
from my home in southwest Washington. However, it was a rare convertible and the
seller had restored the convertible top mechanism, including a new oak bow and header
piece. In spite of all those negatives, I saw its potential to be a beautiful street
rod so I bought it for the reserve price of $6000.
The seller, Murray King, happens to run a 20,000 square foot, full-service restoration
shop called “Kustom King” in Spruce Grove, AB. The shop sits in the corner of a
5-acre yard full of 1930’s to 1970’s classic project and parts cars. You can take
a tour of the yard and shop on Murray’s website (www.kustomking.net).
Murray and his crew are master metalworkers and the exchange rate for our dollars
was pretty good at the time, so I made a deal with him to do the sheet metal restoration
on the Desoto, provided he could complete the work by the end of June. That schedule
was firm met because my wife, Debra, and I had already planned a drive to Alaskain
June and we could make a side trip to pick the car up in July on our way back.
Kustom King started the metal restoration by fabricating a new floor supported on
“hat channels”. They then made new B-pillars, new door skins and inner door structures
with hidden hinges and Bearclaw latches for the suicide doors. They made a new skin
for the trunk lid and a new rear pan. Because the original fenders were so far gone
and I had asked them to tub the rear wheel wells for wider tires anyway, they widened
and reshaped a pair of Model A Ford rear fenders and tubbed the wheel wells to match
them. They also fabricated new running board aprons and fit them to the new running
boards that I sent them. Fortunately, the Desoto running boards are the same as
the more common 1932 Plymouthand Buckeye Rubber Parts reproduces them.
Murray fabricated a duplicate of the original grill which was too badly pitted to
save. His crew also made new quarter panels and rebuilt the original front fenders,
including filling the spare tire wells that I didn’t want. They also made a custom
reproduction of the lower grill splash shield and then sprayed everything with high-build
primer before turning the car over to me. Best of all, they had the car done when
we arrived to pick it up.
Deb and I trailered the car home to SW Washington in late June of 2006 and I spent
the next year planning the build and collecting needed parts. I was elated when
I happened upon a pair of restored genuine 1932 Desoto horns at the annual Portland
Swap Meet and my day was complete when I found a needed headlight stand on a table
full of other unidentified junk at the same meet. The parts hunt went on well into
2007 and included a trip east to the Hershey and Carlisleswap meets which I had wanted
to attend for many years. I spent a couple of enjoyable days at each and walked
many miles through hundreds of display spaces. Unfortunately, I left both meets
empty-handed, having found nothing that I needed for the Desoto.
My persistent attention to eBay proved more fruitful and eventually produced a restorable
original flying lady hood ornament, a grille shell emblem, exterior door handles,
inner windshield side garnish moldings from a ’32 Plymouth convertible, taillight
bezels and matching lenses. I used ’39 Plymouthinner door handles with ’48 Ford
escutcheons and connected them and the exterior handles to Bear claw latches with
linkage that I fabricated. I made taillight buckets from 3-inch PVC pipe caps, fitted
them with LED lights, duplicated the original DeSoto lens script in vinyl at a local
sign shop and mounted the taillights on stands of that I seem to remember having
come from a 1930-something Graham car. Before sending the headlight stands to the
chrome shop along with the grille and other parts, I modified their ball sockets
to fit Vintique’s reproduction ’30 Model A Ford stainless headlights. Those headlights
are similar in shape to the original Desoto units, but a little smaller in diameter.
They proved to be good substitutes when I couldn’t locate usable Desoto headlight
doors and lenses.
I had a little difficulty deciding what front suspension to use on the Desoto. I
wanted an independent suspension with air bags, but a little measuring revealed that
the upper hats of a Mustang II would conflict with front fenders. I was thinking
about using a Jaguar XJ6 IFS when I discovered that Kugel Komponents listed an IFS
to fit a ’32 Plymouth. After confirming that the Plymouth frame dimensions were
the same as the Desoto, I decided to spring for Kugel’s fully polished Phase 2 stainless
unit with a manual rack & pinion, Wilwood disc brakes and Air-Ride ShockWaves. I
also ordered a matching parallel 4-bar unit with ShockWaves and panhard bar to hold
an 8-inch Maverick rear axle in place. I modified the Maverick’s axle flanges and
fabricated bearing spacers so that I could use ’94 Crown Victoriadisc brakes on the
rear end. The Crown Victoria uses a disc with an internal drum emergency brake.
I connected the emergency brakes to a ’40 Ford handle that I mounted under the dash.
Although some guys are more nostalgic when selecting a power plant for their ride,
I’m an engineer who appreciates the easy-starting, smooth-running, powerful computer-driven
engines found in the newer American cars and trucks. While there are lots of terrific
engine/trans combinations available in a crate or from a donor car, this Desoto had
to have a Mopar motor and it had to fit inside the hood’s side panels to preserve
the “original” look I wanted. An older baby hemi, a 318/360 small block, or even
the later 5.2/5.9 liter Magnum motor would have fit, but I have been so impressed
by the third generation hemi in my Jeep Commander that I opted to go that direction.
While the Ram truck, Dodge/Chrysler cars, Durangoand Jeep all share this same hemi
engine, there are notable differences in the placement of the alternator, PS pump
and A/C compressor that made the Dodge Ram engine the best choice for the Desoto’s
narrow engine compartment. The Ram hemi has the serpentine belt-driven accessories
stacked high and tight against the engine so it fits in a narrow space, while the
cars and Jeep spread them out lower and wider. The new hemi measures only 26 inches
wide across and weighs just a little over 500 pounds -- nothing like the earlier
hemi engines.
The 3rd generation hemi also presented more of a learning experience and a challenge
to me than the earlier engines did, so I started shopping for one. I located a 5.7
liter hemi and 45RFE transmission on eBay for a great price. They were from a wrecked
2004 Dodge Ram 1500 2WD that had only 13,000 miles on it. Since the engine had so
few miles and since it was already rated at 345 horsepower, I made only a few performance
improvements, including installation of an SRT8 camshaft and heavier valve springs
from a 6.1L hemi and a K&N air filter. I sent the PCM to B&G Chrysler Specialties
to have the anti-theft programming removed. This is a necessity if you aren’t using
an original ignition switch and key because Chrysler’s anti-theft Sentry Key Imobilizer
Module (SKIM) will only allow the engine to run for a few seconds after starting
if it doesn’t recognize the key. B&G also raised the rev limit from 5700 to 6200
rpm to take advantage of the new camshaft and heavier valve springs.
I spruced up the engine with chrome valve covers, stainless bolts and cobalt blue
paint and did my best to clean up the mass of wiring that was originally present.
When you retain the hemi’s electronic fuel injection, the drive-by-wire throttle
pedal, all the sensors, and the eight ignition coils firing sixteen plugs, there
is a lot of wiring visible and it isn’t easy to hide. I cleaned things up a little
by using Hotwire’s street rod hemi engine/trans wiring harness. I also installed
a set of “short” plug wires. Each coil on a 2003-5 hemi fires every revolution and
sends a spark to one of the two plugs in its own cylinder and also to one in the
cylinder that is 360 degrees out of phase in the firing order. That other cylinder’s
coil returns the favor by firing one of the first cylinder’s plugs and one of its
own. This, of course, requires many plug wires to run back and forth across the
intake manifold between pairs of cylinders. The obvious question is “Why not let
each coil fire the two plugs in its own cylinder and eliminate the long plug wires
to the other cylinders?” Substitution of aftermarket short plug wires lets that
happen and eliminates the spaghetti of plug wires running across the intake manifold.
This alteration has no apparent downside; Chrysler seems to have had second thoughts
about the long wires and eliminated them in 2006-up Hemis.
One thing that made this somewhat unusual project easier was finding a 1932 Plymouthframe
that I was able to purchase for a couple hundred bucks. I had the Plymouthframe
dipped and stripped, then used my porta-power tools to remove some twists and kinks
from ancient fender benders. Having a second frame made it possible for me to keep
the body, fenders, hood and grille shell on the original frame for measurement purposes
while I built the new chassis and installed the suspension, engine, trans and rear
end, radiator and other parts on the new frame. With the ability to measure body
and mechanical part locations relative to the two frames, I could better determine
what alterations had to be made for everything to fit. This helped immensely in
locating the engine and suspension components, building the transmission tunnel and
recessing the firewall to closely fit the engine.
Although the early Mopar frames are pretty stout by themselves, I boxed the front
frame rails with 12 gauge plates anyway. The box plates cleaned things up aesthetically
and also made good mounting surfaces for the motor mount brackets. Aftermarket motor
mounts are available for the new hemi, but I wanted to use the original Ram motor
mounts because of their great vibration dampening ability. Unfortunately, the left
mount was too long to fit inside the frame rails and was also quite a bit rearward
of the right mount, messing with my sense of symmetry. I solved that problem by
using two right mounts. The rearward offset built into the right mount became a
forward offset when used on the left side. This compensated for the fact that the
block has threaded holes at different locations on the right and left sides. When
the right two mounts were bolted on, I had achieved symmetry and both mounts now
fit inside the boxed frame rails. After deciding where the engine had to sit, I
welded a couple of vertical plates to each of the frame rail box plates, sandwiching
the mount between these plates with a 12mm thru bolt.
The long 45RFE automatic overdrive transmission cleared the original Desoto X-member
with only a little trimming of its flanges. I reinforced the trimmed flanges and
fabricated a new trans mount support from rectangular steel tubing which I hung from
the x-member.
The master cylinder is a 1-inch polished aluminum Wilwood unit with a hanging pedal
that I fabricated using part of a ’77 Firebird unit that I long ago salvaged. The
pedal ratio is 6.5:1 and it works fine without a booster. Pedal travel is moderate
and you don’t have to use both feet to stop.
Both front and rear suspensions have adjustable Air-Ride ShockWaves. There’s an
onboard compressor and individual gauges and control switches for each wheel.
The steering column is an early-70’s Chevy tilting floorshift unit with a custom-built
metal shroud to hide the lower column. It is topped by a polished cast aluminum
leather-covered banjo steering wheel.
The 2004 power steering pump reservoir wouldn’t quite fit inside the hood sides,
but I didn’t need power steering in this lightweight car, so I pitched the reservoir,
gutted the pump and converted it into an idler pulley so I could use the stock serpentine
belt.
Anyone doing a similar engine conversion may find, as I did, that fitting the starter,
left side exhaust pipe and steering shaft into the same small space is impossible.
I was happy to discover that the Durango5.7L hemi has a starter on the passenger
side. This starter can be used on the truck engine since the bellhousing has the
necessary starter nose recess and starter bolt holes on each side. The switchover
is a snap if done while the engine and trans are out of the car. They must be unbolted
and separated slightly to remove the cover plate between the engine and bellhousing
and replace it with a Durangounit. A Durango cover plate is available from Mopar
for about ten bucks.
The 2.5 inch dual exhaust system includes two catalytic converters, four oxygen sensors,
Flow Master mufflers and a cross-over that also serves as a driveshaft safety loop.
The transmission is a computer controlled Dodge 45RFE 4-speed automatic with overdrive.
I added Traction-Lok and 3.80 gears to the Maverick third member to take advantage
of the RFE45’s overdrive. The shifter is a Lokar unit. The driveshaft was custom
made by Drivelines of Oregon.
The fuel tank is a RockValleycustom built 12-gallon unit with an internal fuel pump.
I used a ’99 Corvette fuel filter with built in pressure regulator and return line
as recommended on Street & Performance’s website. Street & Performance has done
numerous Hemi conversions and has a ton of valuable info for anyone contemplating
such a project.
I used a 21-circuit EZ Wiring harness for the chassis in combination with Hotwire’s
engine/trans wiring harness.
Mac’s Radiator of Portland fabricated the radiator to fit the Desoto grille shell.
It has an integral transmission cooler and is fitted with a Monster fan by Vintage
Air. I installed a heating and air conditioning package by Vintage Air using the
Dodge Ram compressor. I fabricated ducts and vents to defrost the windshield. Vintage
Air heating and cooling vents are mounted in the dash.
Over the course of a few months, I fit all of the parts together, assembling, disassembling
and adjusting things until it all fit. I did the final body work, block sanding
and most of the preparation for painting before hauling the separate body parts to
Stan’s Body Shop in my hometown of Battle Ground, WA. Stan Warden, who is not the
original Stan that the shop is named for, ironed out the last flaws before owner
Jeremy Winders sprayed the Dupont Dark Red Wine Metallic (a 2007-up Kia color) and
clear coat. Steve Bremer of Stan’s did the final cutting and polishing after I assembled
the body parts.
Gauges are Traditional Series by Classic Instruments. They include a SpeedTachular
(combination speedometer and tachometer) as well as oil pressure, fuel, voltage and
engine temperature gauges. Classic’s speedometer is one of the few that will accept
the hemi’s computer signal directly. It also has one-button calibration that is
remarkably simple. I installed the Air-Ride gauges and controls on the floor near
the Lokar shifter where they are easily accessible and unobtrusive.
I needed a bench seat with a fold-down back to allow access to a compartment containing
the battery, air compressor and tank and radio box. I found one in a Mitsubishi
mini-pickup at the local U-Pull-It yard for $25. I sectioned and reshaped the seat
frame to fit the Desoto passenger compartment. I covered everything I could see
on the inside of the body with Raamaudio’s sound deadener. I made the door, kick
and other interior panels from 1/8” ABS sheet material and then took the car to NW
Auto Upholstery in Vancouver, WAwhere Don Schwendler and his guys wrapped the seats
and panels in Allante ‘Elephant’. They carpeted the floors and trunk in black and
made a black Hartz cloth convertible top to fit the restored top mechanism. Although
I called all over the country, I couldn’t find a replacement convertible top or even
a pattern for one, so Robbie at NW Auto created the top from scratch. He incorporated
a beveled glass rear window that I had found and restored. Robbie also sewed up
a padded boot to hide the top when it is down.
I installed power windows in the doors and added power-actuated pin locks for the
suicide doors to ensure that they stay closed at higher speeds. The safety locks
can be actuated manually or with a keyless entry fob. I also mounted a Secret Audio
AM/FM unit in the compartment behind the seat which is operated by a hand-held remote
control. The small display head is mounted on the firewall under the dash where
it can be seen, but where it doesn’t clutter up the dash. The inner door handles
are replated 1939 Plymouthitems and use spring-loaded 1948 Ford escutcheons. The
hidden compartment between the seat and the trunk is accessible from either front
or back and contains the battery, Air-Ride compressor and valve manifold and the
Secret Audio box.
I loved the classic design of the ’32 Desoto and didn’t want to change it much, but
I did want a more aggressive look. Big and little tires on Roadster brand chromed
Kelsey-Hayes style wire wheels and the new suspension components gave it the stance
I wanted. The wheel caps needed appropriate centers, so I turned out some plastic
discs, painted them body color and crowned them with some commemorative coins honoring
the explorer Hernando de Soto for whom the car brand was named.
Exterior trim includes a fully restored original 1932 Desoto flying lady hood ornament,
1930 Model A Ford stainless steel headlights with integral turn signals by Vintique
mounted on rechromed original Desoto stands, restored original Desoto bugle horns,
a one-off reproduction of the original chrome grill, swan neck mirrors, restored
original door handles, custom-made taillights with Desoto script lenses, chrome bullet
backup lights, a third brake light in license frame, power antenna and a beautiful
reproduction swing-out windshield from N/C Industries. A stainless steel electric
windshield wiper is used on the driver’s side. Bumpers and brackets are stainless
steel 1934 Chevrolet reproductions from RockValley.
Chrome wire wheels are Roadster brand Kelsey-Hayes style. Rear tires are 255R65-15
BFG-T/A on 8-inch wheels and front tires are 195R65-15 Zexius on 7-inch wheels.